Your home router connects your home network to the Internet. Most home routers also function as Wireless Access points and are commonly called wireless routers. Home routers are usually supplied by an ISP (Internet Service Provider) as part of your Internet package.
Router Interfaces and Physical Connections
All routers have two interfaces:
- Local – This is the local, home, office network
- External – The Internet
On the Internet side the router will may have a single connection labelled DSL which uses a RJ12 telephone connection.
This connects to the telephone network via a broadband filter.
You may also have a broadband/WAN connector. This is used for connecting to a cable modem or fibre modem as shown below:
On the Local side the router will have a Wi-Fi interface and Ethernet ports. The router shown above is my home router which has 4 Ethernet ports for wired clients, as well as supporting WI-Fi access. In addition most also have a USB socket for connecting the router to a computer for initial set up.
Wireless Router Setup and Configuration
Physical Setup
The home router will have a port labelled DSL this connects using a RJ12 connector to a microfilter and then to your phone line. (ADSL) Always remember to use the microfilter as without it it may not work or may only work intermittently. For fibre and cable use the WAN port on the Router to connect to your cable or fibre modem using an Ethernet cable.
Router Configuration
To change the configuration settings of the router you will need to login to the router.
There are several ways you can do this,they are:
- Using a computer connected with a USB cable.
- Utilizing a computer connected with an Ethernet cable and a web interface.
- Using a computer connected using Wi-Fiand a web interface.
Using Wi-Fi and The Web Interface
Almost all home routers can be setup and managed using a Web interface. e.g. a web browser.
To use this you will need to connect to the router using the Ethernet port or Wi-Fi.
To connect using Wi-Fi you will need to know:
- the SSID of the router, which should come with the documentation. (you can change the SSID later).
- The Wi-Fi password.
The BT Home Hub that I use comes with a handy pull out card with the details printed on it, as shown below
Step 1- Setting up Wi-fi
The first step is to setup Wi-Fi access on your Laptop/PC using the Wi-Fi details (SSID and password). Now you should be able to connect to the router, and the router should assign you an IP address. You can check your IP address and find the IP address of the router by using the ipconfig command.
Open a command prompt an enter Ipconfig/all. Look for the default gateway. This is the address of your router.
Step 2 Connecting to the Router
To connect to the router you need to know:
- The router IP address
- The router default admin username and password
Common default addresses are: 192.168.1.254 , 192.168.1.1 and 192.168.0.1.
Common default admin user account name and password are admin and administrator and password is password
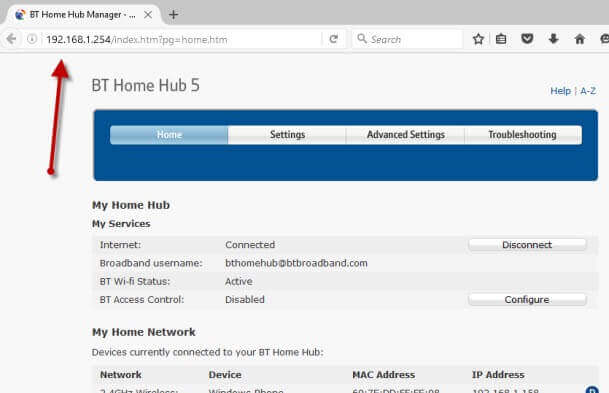
To login open a web browser and enter the IP address of the router e.g. 192.168.1.254.
You should get a welcome screen or an overview screen as shown above.
If you try to make changes you will be prompted to login.
Once you are logged in you can change the router configuration.
There are several things that you usually need to configure.
- A Network SSID for the wireless clients. (wireless router only)
- Wireless channels (wireless router only)
- Admin password for router management
- Password for the DSL link.
- Internal IP address ranges.
Changing the Network SSID and Password
It is a good idea to change this to a name and password that are easy to remember for you, but not easy to guess. In restaurant,hotels etc you often see the restaurant or hotel name as the SSID.
Important! -When you change it you will lose the connection and you will need to change your laptop Wi-Fi settings to match the new settings.
On the BT home Hub you will find the Wi-Fi settings in the advanced section.
Changing the Admin Password for Router Management
You should change this from the default value, as if you don’t allow security hacks to go through your network.
Credit by Steve’s Smart Home Guide.


